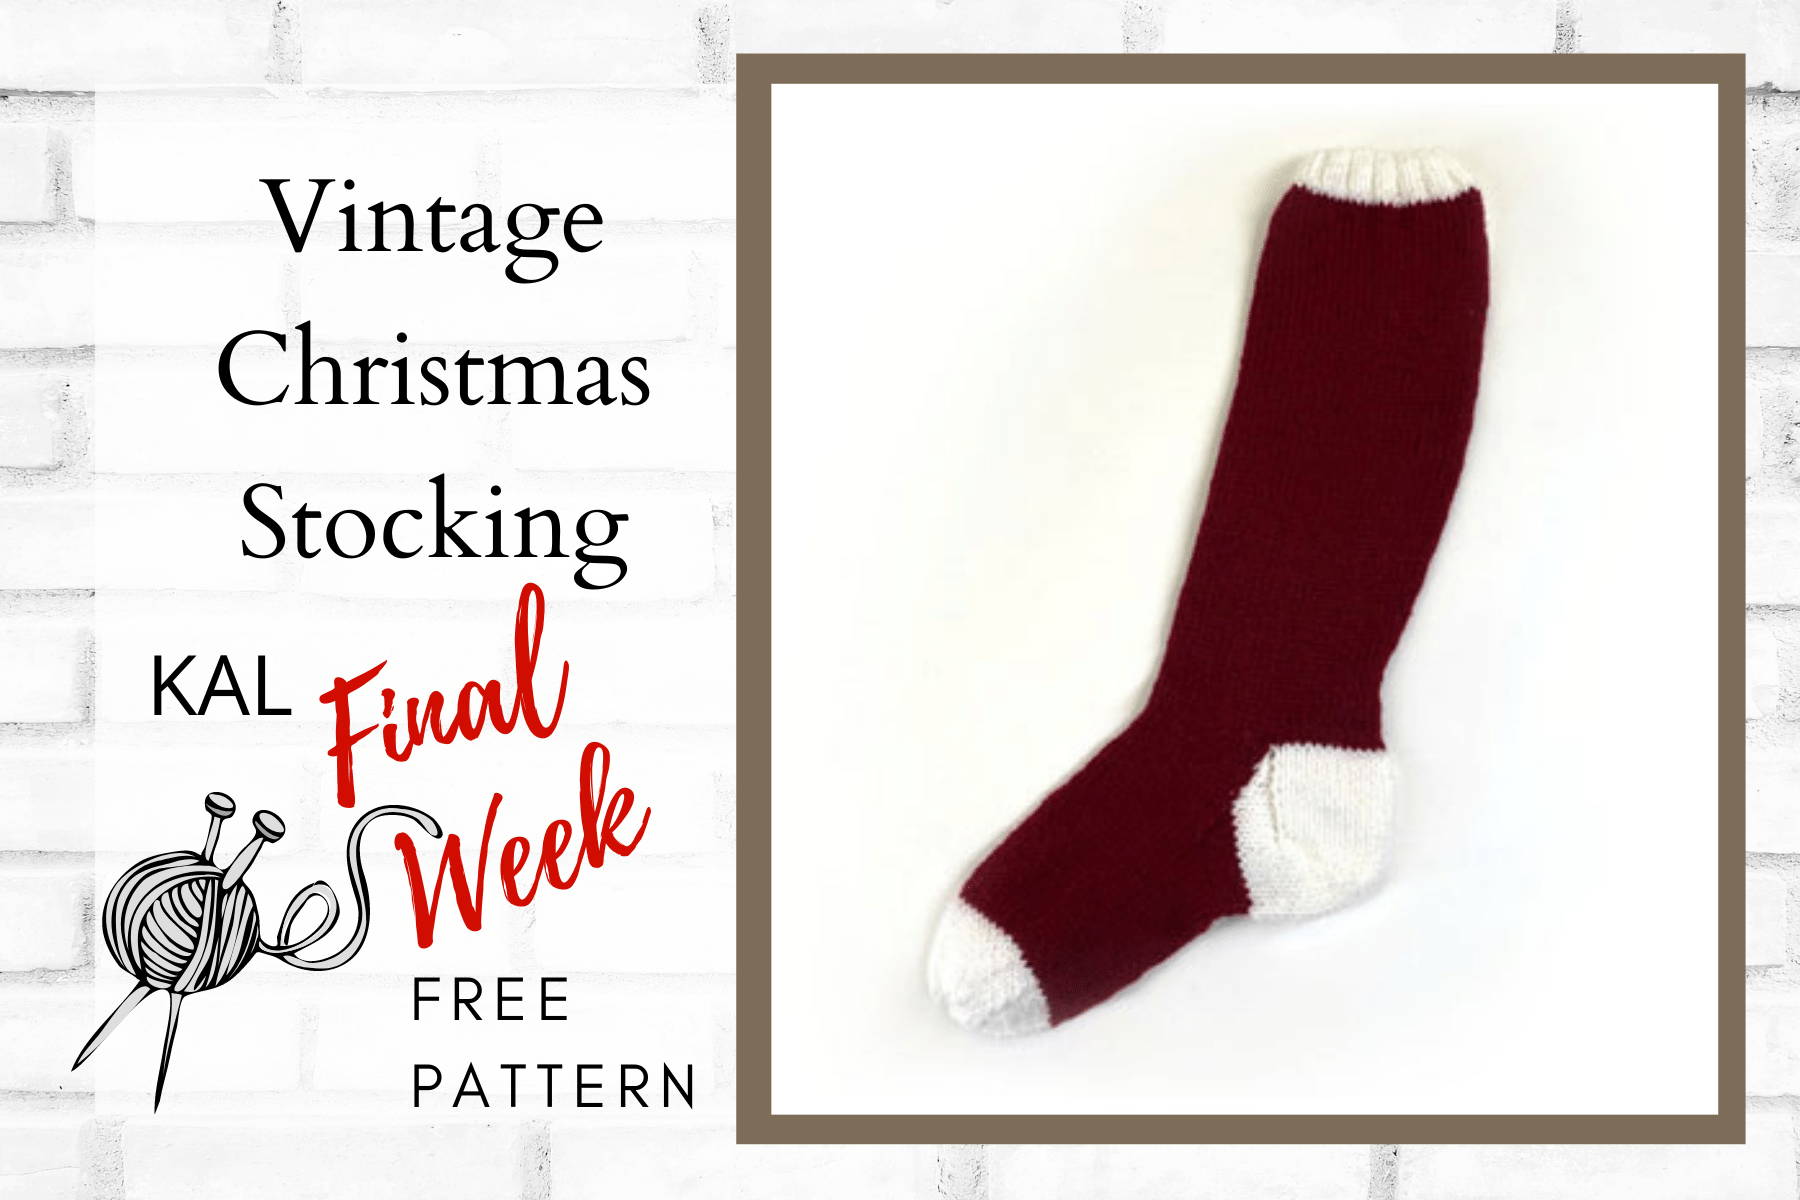
Yay you are almost done with your Christmas Stocking. We spent a lot of time on this knit along. Over the years we have loved hearing stories about your favorite aunt, or precious moms and grandparents who made sure that every new child or spouse had their very own stocking to welcome them into the family. We know a lot of new knitters turn to the art to continue that tradition. Every month we get requests for resources on these wonderful stockings and now we have a full tutorial for every skill level that takes a knitter through every single stitch. For all of those patiently waiting, thank you for your excitement on our YouTube channels and other Social Platforms, we are so excited that you are excited and hope you will join us for more projects throughout the 2022. We have more exciting projects on the way.
Free Knit Stocking Pattern
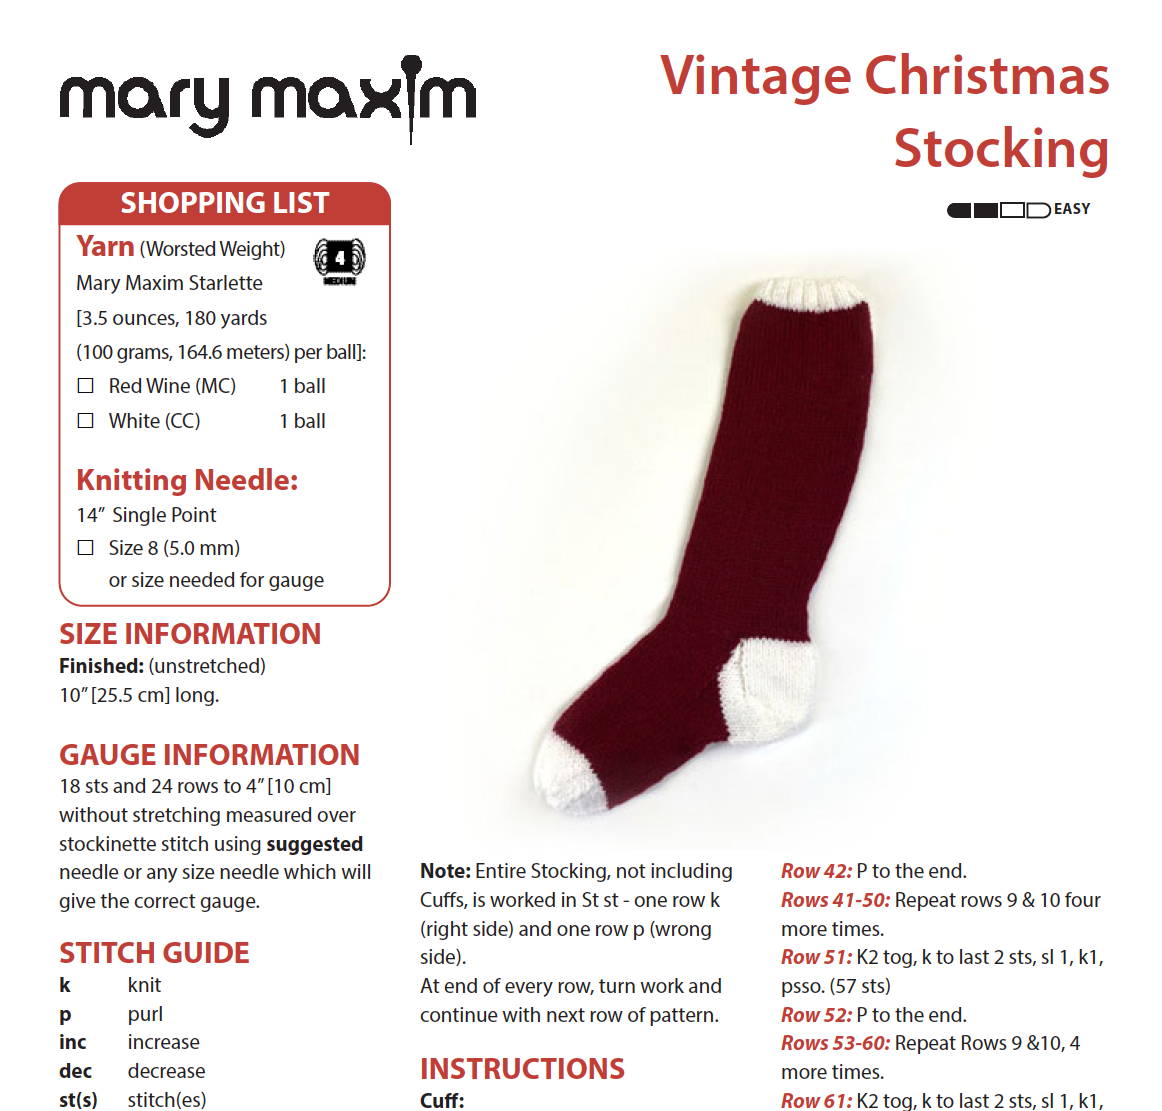
SIZE INFORMATION
Finished: (unstretched)
10” [25.5 cm] long.
GAUGE INFORMATION
18 sts and 24 rows to 4” [10 cm] without stretching measured over stockinette stitch using suggested needle or any size needle which will give the correct gauge.
STITCH GUIDE
k knit
p. purl
inc. increase
dec. decrease
st(s). stitch(es)
cm. centimeters
mm. millimeter
rem. remain or remaining
beg. beginning
rep. repeat
rnd. round
tog. together
St st. Stockinette Stitch
psso pass slipped stitch over k1
k1fb Increase one st by knitting into front and back of next stitch
Note: Entire Stocking, not including Cuffs, is worked in St st - one row k (right side) and one row p (wrong side).
At end of every row, turn work and continue with next row of pattern.
INSTRUCTIONS for Final Week
Foot:
Row 1: Knit.
Row 2: Purl.
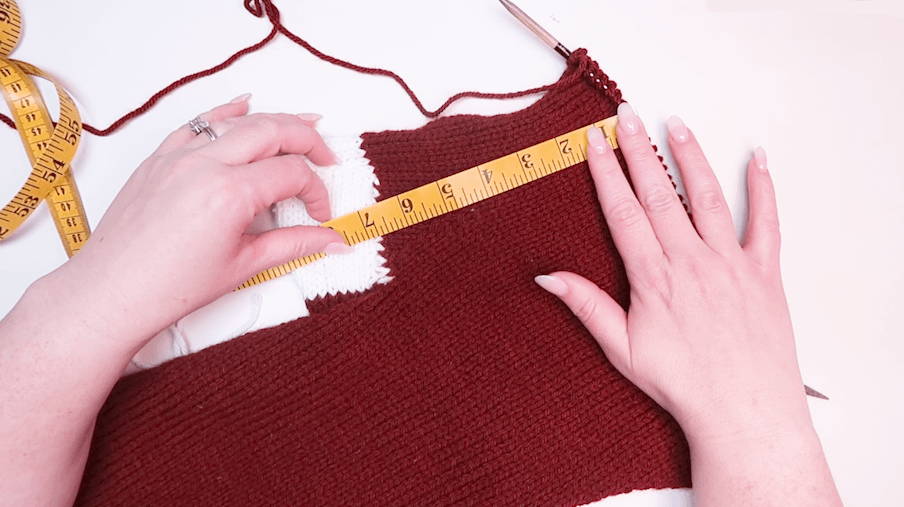
Repeat these 2 rows until work measures about 7” [17.5 cm] from color change.
This is where we pick up on this week's tutorial
Next Row: K 23, k2 tog, k 24. (48 sts)
Next Row: P to end.Cut MC, leaving a long tail for sewing.
To Shape Toe:
Using CC1 and with right side facing, continue as follows:
Row 1: K9, k2 tog, k2, sl 1, k1, psso,k 18, k2 tog, k2, sl 1, k1, psso, k9.(44 sts)
Row 2 and every alternate row following: P to end.
Row 3: K8, k2 tog, k2, sl 1, k1, psso,k 16, k2 tog, k2, sl 1, k1 psso, k8.(40 sts)
Row 5: K7, k2 tog, k2 sl 1, k1, psso,k 14, k2 tog, k2, sl 1, k1, psso, k7.(36 sts)
Row 7: K6, k2 tog, k2, sl 1, k1, psso,k 12, k2 tog, k2, sl 1, k1, psso, k6.(32 sts)
Row 9: K5, k2 tog, k2, sl 1, k1, psso,k 10, k2 tog, k2, sl 1, k1, psso, k5.(28 sts)
Row 11: K4, k2 tog, k2, sl 1, k1, psso, k8, k2 tog, k2, sl 1, k1, psso, k4. (24 sts)
Row 13: K3, k2 tog, sl 1, k1, psso, k6, k2 tog, k2, sl 1, k1, psso, k3. (20 sts)
Row 15: K2, k2 tog, k2, sl 1, k1, psso, k4, k2 tog, k2, sl 1, k1, psso, k2. (16 sts)
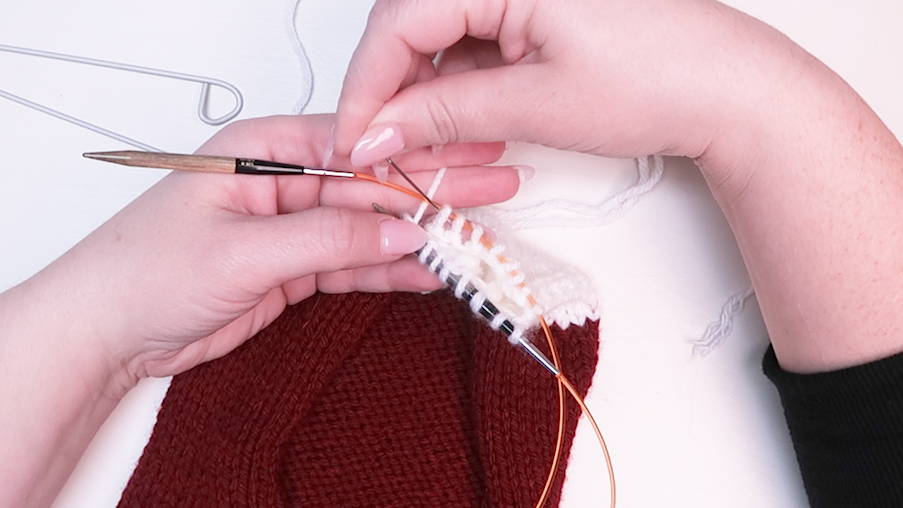
Wrong side facing you, place first 4 sts onto st holder, sl next 8 sts onto needle not in use, sl last 4 sts onto another st holder.Now beg with 4th st on first st holder, sl 4 sts onto 2nd needle, then pick up yarn and k4 from 2nd st holder. There are now 8 sts on each of 2 needles, ready for grafting according to instructions
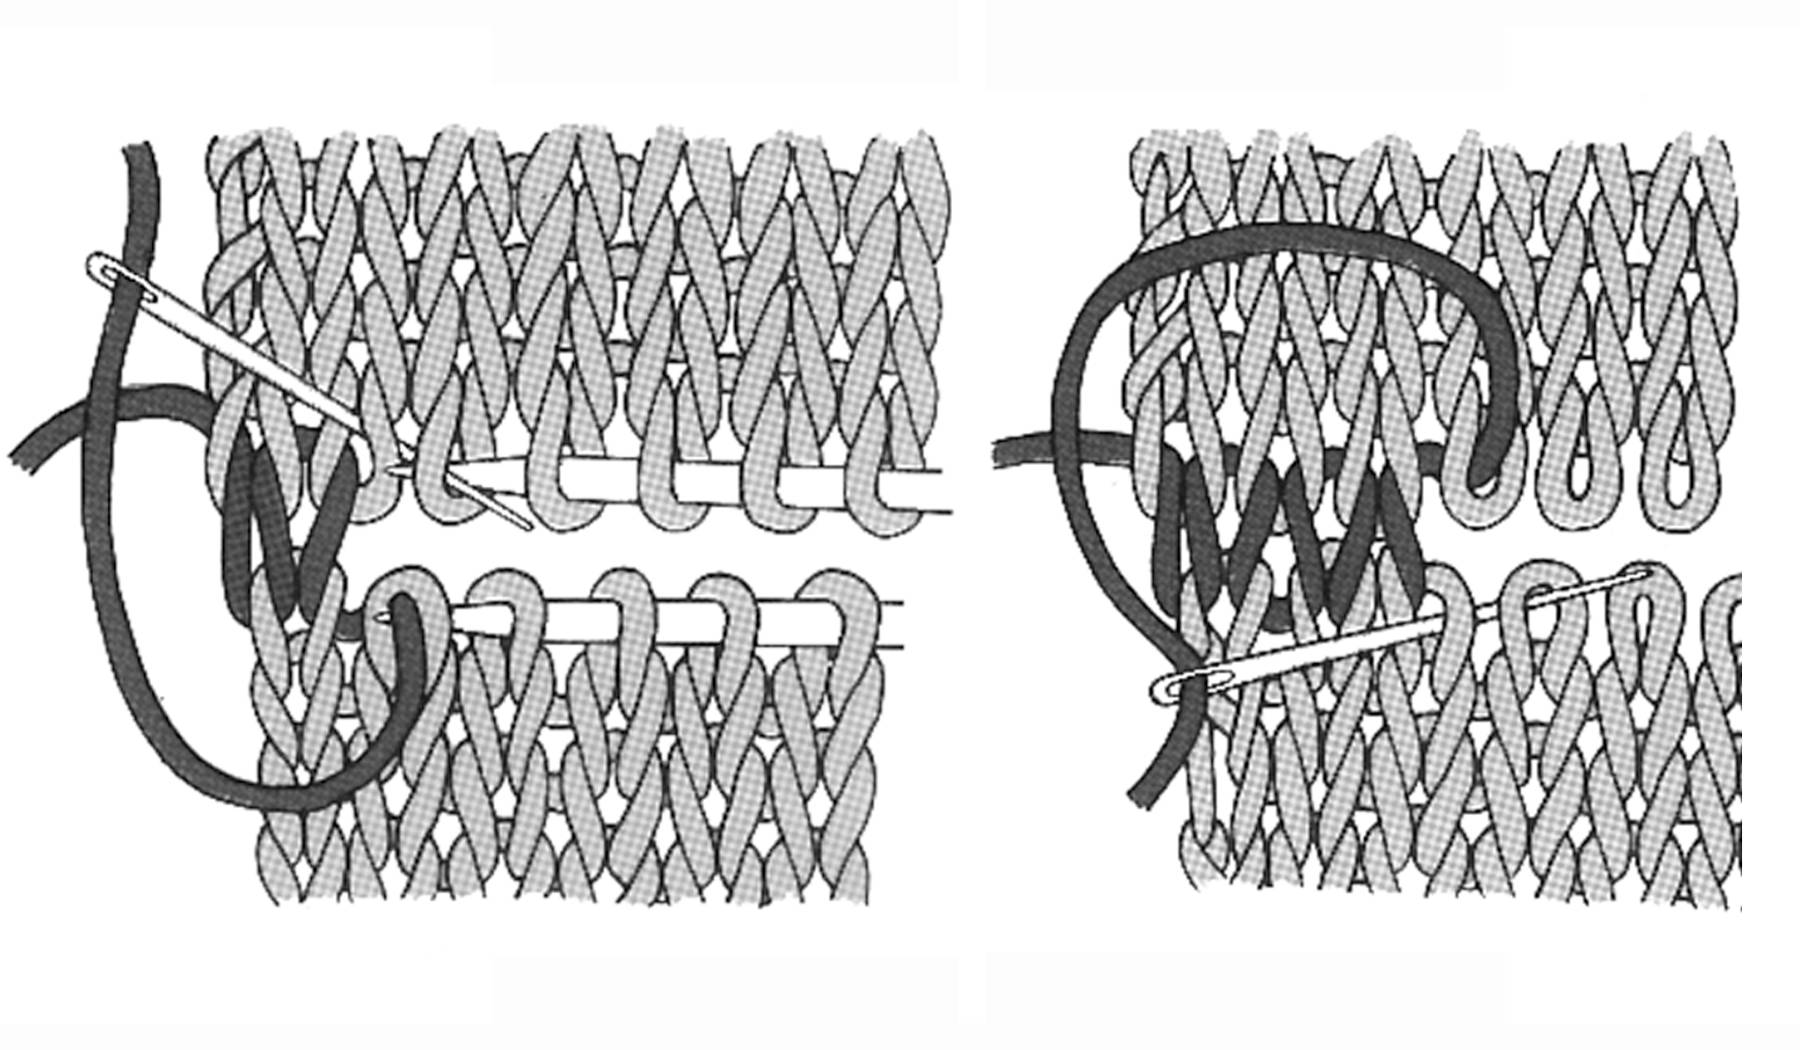
How to stitch the Kitchener stitch
To join two sections of knitting without a ridge or seam, divide the stitches onto two needles evenly with the wrong sides of work facing one another.Thread a needle with a length of yarn.
1. Insert needle into first stitch on front needle as if to knit, slip off needle.
2. Insert needle into second stitch on front needle as if to purl, leave on needle.
3. Insert needle into first st on back needle as if to purl, slip off needle.
4. Insert needle into second stitch on back needle as if to knit, leave on needle.
Repeat these 4 steps until all sts have been worked. Fasten off.

To Complete: Sew all seams with matching yarn.
Embroider name if desired, just below Cuff.
Weave in all ends.
Video Tutorials
As a refresher here are the articles and videos you'll need to reference to complete this week's portion of the pattern. Check out the step by step guide below!
How to Knit
Learning how to knit is a wonderfully rewarding experience. Before you get started, we want to warn you that it is absolutely addicting. To get started learning how to knit, you will want to grab some needles and yarn. For this tutorial, we are using Mary Maxim Best Value worsted weight yarn (the most commonly used size yarn) and size 8 (5 mm) knitting needles.
How to Purl
When we discussed How to Knit in the previous post, we mentioned that Knit and Purl are essentially two sides of the same coin. If you knit on one side of your fabric, it will always show up as a purl on the other side. In this tutorial we will learn how to purl.
How to Knit the Stockinette Stitch
The Stockinette Stitch or Stocking Stitch is one of the most recognizable and most versatile stitches in the knitter's repertoire. When most people think of knitting, they think of the Stockinette stitch. If you are a seasoned knitter, then you have likely used this stitch many times. If you are new to knitting, it’s a great stitch to learn after the Garter Stitch.
How to Knit a Vintage Christmas Stocking | Knit Along Week 3
It's Week 2 of our Vintage Christmas Stocking KAL! This week we are casting on, knitting the ribbing, and working the cuff of our stocking. We included the complete pattern for the stocking shown here so you can work at your own pace. You can also use this as an updated modern guide for the classic vintage stocking.
Step by Step Christmas Stocking Tutorial
Step 1: We are picking up from Week 3 after you turn the heel and knit 7" from the color change
Next Row: K 23, k2 tog, k 24. (48 sts)
Next Row: P to end. Cut MC, leaving a long tail for sewing.


Step 2: Next we will shape the toe on both sides of the foot.
To Shape Toe:
Using CC1 and with right side facing, continue as follows:
Row 1: K9, k2 tog, k2, sl 1, k1, psso, k 18, k2 tog, k2, sl 1, k1, psso, k9. (44 sts)
Row 2 and every alternate row following: P to end.
Row 3: K8, k2 tog, k2, sl 1, k1, psso, k 16, k2 tog, k2, sl 1, k1, psso, k8. (44 sts)
Continue following pattern above.
To Shape Toe:
When shaping the heel you will be decreasing by 4 stitches on every odd or purl Row. Continue decreasing every other row until you have 16 stitches on your needles.
Step 4: These are general kitchener instructions included in all of the stocking patterns. Our instructions below under How to Graft or Work a Kitchener Stitch pertains to this stocking in particular.
Thread a needle with a length of yarn.
1. Insert needle into first stitch on front needle as if to knit, slip off needle.
2. Insert needle into second stitch on front needle as if to purl, leave on needle.
3. Insert needle into first st on back needle as if to purl, slip off needle.
4. Insert needle into second stitch on back needle as if to knit, leave on needle.
Repeat these 4 steps until all sts have been worked. Fasten off.
How to Graft or Work a Kitchener Stitch
When grafting or working a kitchener stitch it's important to remember you are mimicking the stitches on both needles with the new yarn.
Start by cutting your yarn leaving a long tail for grafting and thread a darning needle. Insert the needle into the last stitch (first stitch from Left to Right) on the opposite needle from left to right and pull the yarn through.
Repeat the steps below
Then, insert your needle through the last stitch, and the next stitch from left to right on the needle closest to you and pull the yarn through both stitches.
Next, insert your needle from the left to right thought same last stitch (first stitch from left to right) on the opposite needle and into the next stitch on the needle and pull the yarn through both stitches.
Slip the first stitch off of each knitting needle.
Repeat the last three steps until all stitches have been work and no stitches remain on the knitting needles. Work the needle back to the seam for seaming with the mattress stitch.
Seam Your Stocking using the Mattress Stitch

Step 5:
Seaming your Stocking:
The Mattress Stitch is a common technique to seam the sides of two pieces of fabric together.
Lay your stocking so you can see both right sides facing you. Thread a darning needle with one of the long tails in the corresponding color. The goal of the mattress stitch is for this seam to dissappear.
Find the very first column of knit stitches on the fabric on either the right or left side. In between the "V's" of your knit stitch you will see a bar that is the pearl if you were to view the fabric from the back. Slip your needle under the first (two bars shown in video) bar and pull your tapestry needle through.
Now do the same to the other side of your stocking.
Continue working back and forth until your stocing is completely seamed.
In the video tutorial I sewed under two bars vs. one, this is up to your personal preference. When you sew under two bars, the seam may become more bulky.
When finished weave in your ends and trim your ends. Your stocking is complete.
Christmas Stocking Video Tutorial Last Week
Stay Tuned!
Make sure to check back next week for the last part of our Knit A Long. Check out the rest of the weeks of this Knit Along: Christmas Stockings Week 1, Christmas Stockings Week 2, Christmas Stockings Week 3,

