Get up to 60% off Yarn Shop Yarn Deals

Welcome to our store Learn more about Mary Maxim

New items added! View Our Newest Items

FREE TOTE BAG with orders of $99+

Simply add item 34530 to cart and use code. Now thru 11/12/24.

99TOTE24

How to Crochet a Turtle: Step-by-Step Guide (+10 Free Patterns)

Mastering the art of creating a turtle in the intricate world of crochet holds a special allure. From selecting the suitable yarn to perfecting each stitch, crafting these charming creatures requires a blend of patience and skill. As we unravel the steps involved in crocheting a turtle, a captivating journey awaits, filled with creativity and attention to detail. Stay tuned as we guide you through the process, offering invaluable tips and insights to ensure your turtle creation is unique and a testament to your crochet prowess.

Materials Needed

To crochet a turtle using a Mary Maxim kit, you will need a specific set of materials to ensure a successful and enjoyable crafting experience. The kit typically includes high-quality yarn in various colors, crochet hooks in different sizes to achieve the desired tension and texture, safety eyes for a realistic touch, stuffing material to give the turtle shape and volume, a yarn needle for finishing touches, and a pattern with detailed instructions.


Abbreviations Used

Understanding and utilizing abbreviations in crocheting are pivotal in deciphering patterns and enhancing crafting proficiency. Standard abbreviations used in crochet patterns include "ch" for chain, "sc" for single crochet, "dc" for double crochet, "hdc" for half double crochet, and "sl st" for slip stitch.

These abbreviations streamline pattern instructions, making them more concise and accessible. By familiarizing yourself with these abbreviations, you can efficiently read and execute crochet patterns without getting bogged down in lengthy explanations.


Tips for Crocheting a Turtle

In mastering the crochet abbreviations commonly used in patterns, you lay a solid foundation for successfully crafting a delightful turtle amigurumi. Here are some tips to enhance your crocheting experience:


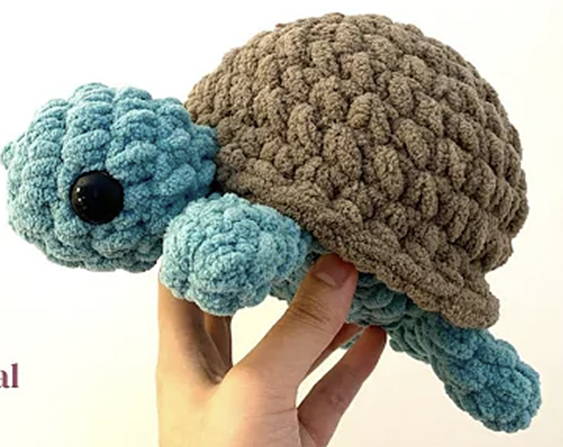
1. Choose the Right Yarn: Opt for soft and suitable yarn for amigurumi projects to ensure your Turtle is cuddly and durable.

2. Use Stitch Markers: Mark the beginning or end of each round with stitch markers to keep track of your rounds, prevent mistakes, and ensure a neat finish.

3. Practice Magic Ring Technique: Master the magic ring technique for starting crochet projects in the round, providing a seamless and tight center for your Turtle's shell.


How to Crochet a Turtle: Instructions

Embarking on the journey of crocheting a turtle requires attention to detail and precision in each step. Each stage is crucial in bringing the Turtle to life, from crafting the head to assembling the final piece. Crocheters can create a charming turtle that showcases their skill and creativity by meticulously following instructions.


Step 1: Making the Head

The initial step in crafting your crocheted Turtle is forming the head with precise stitches and attention to detail.


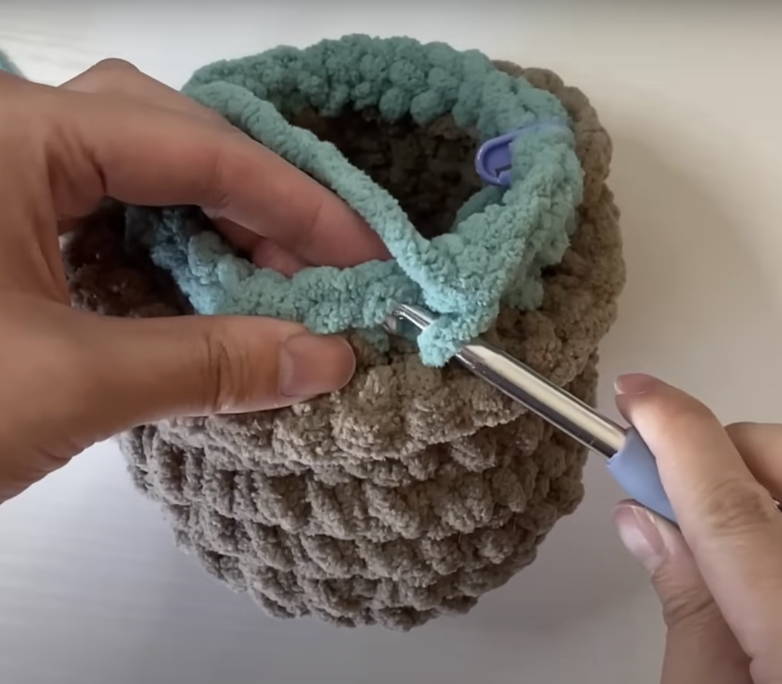
Step 2: Making the Body

Continuing the crocheting process after crafting the head of the Turtle involves skillfully shaping the body with meticulous attention to stitch placement and pattern adherence. To start, create a magic ring and work multiple single crochet stitches into it, gradually increasing the stitch count to achieve the desired width. Maintaining an even tension is crucial to ensure a smooth and uniform body shape.

Consider using a stitch marker to keep track of your rounds and prevent any mistakes. As you work, periodically check the size against the Turtle's head to ensure proportionality. Remember to stuff the body lightly as you progress to give it a plump appearance without being overstuffed. This stage sets the foundation for the Turtle's distinctive form.


Step 3: Legs (make 4)
Crafting the legs of the Turtle requires precision and attention to detail to ensure they seamlessly complement the body's shape and overall appearance. To create the legs effectively, follow these steps:

1. Leg Length: Crochet each leg to the desired length, considering the overall size of the Turtle to maintain proportionality.
2. Leg Attachment: Attach each leg securely to the body using a yarn needle, ensuring they are evenly spaced and aligned to support the Turtle's weight.
3. Toe Detail: Add toe details by creating small stitches at the end of each leg to give a realistic appearance and enhance the Turtle's overall look.

Step 4: Making the Shell
For the creation of the Turtle's distinctive shell in crochet, meticulous attention to stitch placement and pattern execution is paramount to capturing the essence of this unique reptilian feature. Begin by selecting a suitable yarn color to represent the turtle shell realistically. To start forming the shell, crochet a flat circle using the chosen yarn and gradually increase the number of stitches in each round to achieve a rounded shape. Next, work on creating the textured pattern of the shell using techniques such as shell stitches, popcorn stitches, or raised stitches.

Step 5: Assembly
To complete the assembly of your crocheted Turtle, carefully attach the shell to the body with precise stitchwork, ensuring a secure and polished final product. Here are three essential steps to follow for successful assembly:

1. Positioning: Align the shell on the body correctly, ensuring it fits snugly and symmetrically.
2. Stitching: Use a tapestry needle and matching yarn to sew the shell to the body, making sure to hide the stitches neatly.
3. Finishing Touches: Secure any loose ends and trim excess yarn to give your Turtle a clean and professional look.

Step 6: Finishing
Upon completing the assembly of your crocheted Turtle, the final step in crafting a polished and professional finish is to focus on the intricate details of the finishing touches meticulously. Start by weaving in any loose ends using a yarn needle to ensure a neat appearance. Next, consider adding eyes to bring your Turtle to life; you can use safety eyes, beads, or crochet small circles. 

Step 1: Cut the Ribbon
With precision and care, the initial step in crafting a ribbon scrunchie involves carefully cutting the ribbon to the desired length.
- Choose a sharp pair of fabric scissors.
- Measure and cut the ribbon according to your desired scrunchie size.
- Ensure the ends are cleanly cut to prevent fraying.

10 Free Turtle Crochet Patterns
Exploring free turtle crochet patterns unveils a treasure trove of creative possibilities. The Red Heart turtle pillow pal pattern, Lily Sugar'n Cream Zippy the Sea turtle pattern, and other options offer enthusiasts a chance to craft charming turtle-themed creations. From bath accessories to plush toys, these patterns cater to various crochet skill levels, making them accessible to beginners and seasoned crafters alike.

Red Heart turtle pillow pal pattern
Delving into crochet designs, one can explore the intricacies of the Red Heart turtle pillow pal pattern, a delightful addition to the world of Free Turtle Crochet Patterns offered by Mary Maxim Ltd. This charming pattern allows crafters to create a whimsical turtle pillow pal that adds coziness and fun to any room.

Lily Sugar'n Cream zippy the sea turtle pattern
A charming addition to the collection of Free Turtle Crochet Patterns offered by Mary Maxim Ltd is the Lily Sugar'n Cream zippy sea turtle pattern, inviting crafters to create a delightful sea turtle design. This pattern features intricate details that capture the essence of a sea turtle, making it a perfect project for crochet enthusiasts looking to add a touch of ocean-inspired creativity to their work. 

Red heart turtle bath scrubby pattern
The Red Heart turtle bath scrubby pattern, part of the Free Turtle Crochet Patterns collection offered by Mary Maxim Ltd, allows crafters to create a whimsical and practical crochet piece for bathtime indulgence. This delightful pattern combines functionality with charm, making it a fun project for beginners and experienced crocheters. 

Coats & Clark Tommy Turtle pillow pattern
Embark on a delightful crochet journey with the captivating Coats & Clark Tommy Turtle pillow pattern, a charming addition to Mary Maxim Ltd's Free Turtle Crochet Patterns collection. This pattern allows crocheters to create a whimsical Tommy Turtle pillow that adds warmth and creativity to any space. The design features intricate details such as Tommy's shell, eyes, and cute little feet, making it a fun and engaging project for crochet enthusiasts of all skill levels.

Plush turtle-free crochet pattern
Delve into the world of crochet craftsmanship with the alluring Plush Turtle free crochet pattern, a delightful addition to the array of Free Turtle Crochet Patterns offered by Mary Maxim Ltd. This charming pattern allows you to create a cute and cuddly turtle plushie that is perfect for gifting or keeping as a cozy companion. Here are some highlights of this pattern:

- Soft and huggable design that is perfect for children and turtle enthusiasts alike.
- Detailed instructions and clear images will guide you through each step of the crocheting process.
- Customizable features to add your unique touch to the plush turtle creation.

Nika the Turtle crochet pattern
Continuing the exploration of captivating crochet patterns, the Nika the Turtle crochet pattern emerges as a charming addition to Mary Maxim Ltd's collection of Free Turtle Crochet Patterns. This delightful pattern captures the essence of a whimsical turtle with intricate details that make it a joy to create. Nika the Turtle showcases an elaborate and visually appealing shell design, making it a standout piece in any crochet collection.

Sheldon the Turtle crochet pattern
Sheldon the turtle crochet pattern is a delightful addition to Mary Maxim Ltd's collection of Free Turtle Crochet Patterns. It showcases intricate details that capture the whimsical essence of a turtle with charm and creativity. This pattern allows crocheters to create a cute turtle plushie with unique features.

TMNT crochet pattern
Exploring further within Mary Maxim Ltd's array of Free Turtle Crochet Patterns, the TMNT crochet pattern offers enthusiasts a vibrant and nostalgic opportunity to craft beloved turtle characters. This pattern draws inspiration from the iconic Teenage Mutant Ninja Turtles, allowing crocheters to recreate their favorite crime-fighting reptiles in intricate detail.

Amigurumi pumpkin pie turtle crochet pattern
Crafters seeking to add a whimsical touch to their crochet projects can now explore the delightful Amigurumi pumpkin pie turtle crochet pattern within Mary Maxim Ltd's Free Turtle Crochet Patterns collection. This unique pattern combines the charm of a turtle with the cozy essence of a pumpkin pie, making it a perfect seasonal project. Here are three reasons why crocheters are loving this pattern:

1. The Amigurumi pumpkin pie turtle is a fun and creative twist on traditional Amigurumi designs.
2. This pattern allows crafters to showcase their skills in shaping and detailing to bring the Turtle to life.
3. The fusion of a turtle and pumpkin pie adds a touch of whimsy to any crochet collection.
 
Sea turtle ornament crochet pattern
Within the diverse collection of Free Turtle Crochet Patterns offered by Mary Maxim Ltd, the Sea turtle ornament crochet pattern presents crafters with an enchanting opportunity to create a charming and unique decorative piece. This pattern allows crafters to showcase their crochet skills while adding a touch of marine-inspired beauty to their home decor.

Conclusion
Reflecting on Mary Maxim's enduring legacy and commitment to quality throughout its history, the company's dedication to providing exceptional needlework and craft kits has solidified its position as a leader in the industry.