How to Crochet a Bag: A Comprehensive Guide + Free Patterns

Crochet bags are the new trend and are quickly replacing plastic bags for grocery errands or handbags in streetwear. They’re incredibly versatile too, allowing you to design your own bag to suit different uses, whether you want one to bring to the beach or one to hold your buys at your local farmer’s market.


Crocheting bags is a necessary next step in your crochet journey — a practical project that all crafters get into at some point. If you’re ready to crochet your first bag, you’ve come to the right place. In this article, we provide you with a comprehensive guide to crocheting bags plus some free patterns you can use to guide you!

Choosing the Right Yarn and Hook

The most important first step in any crochet project is choosing the right yarn and hook size. Each type or weight of yarn will call for a different hook size, and getting it right is the key to achieving your intended design and the durability of your project.


Let’s start with choosing the right yarn. The yarn you should use is highly dependent on the bag design you’re going to make and its intended use. Are you making a backpack, market bag, tote, or crossbody bag? Do you want your bag to be lacy and open, or do you want a little more protection for your belongings? How tight do you want your stitches to be?


All this plays a role in finding the best yarn for your crochet bag. A general rule of thumb is to find a yarn type that is durable, making for a stronger and long-lasting crochet bag you can use for years to come. Yarn with natural fibers like cotton is the most popular option for crochet bags because of its durability.


Now let’s find the right hook size. While beginners often use a single hook for all their projects, you’re going to need a selection as you advance in your hobby. Your hook size will influence your stitch pattern — a larger hook creates looser stitches while a smaller hook makes tighter and denser stitches.


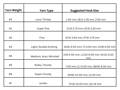
The right hook size will also depend on the type of yarn you’re using. The consensus is that the thicker your yarn is, the larger your hook size should be. Some yarn brands will tell you what hook size is recommended, and crochet bag patterns will also suggest the most suitable hook size. To give you an overview, though, here’s a quick cheat sheet:


Understanding Bag Construction
Thinking about how you’re going to crochet an entire bag can get overwhelming. But it’s actually not that difficult if look at a crochet bag in different pieces. Understanding the construction of your bag will help break the project down into manageable chunks.

A crochet bag can be dissected into three basic parts: the body panels, the straps or handles, and the closures. Each piece may be crocheted differently and call for unique stitches and techniques.

Let’s start with the panels. When making a crochet bag, you typically crochet separate panels for the front, back, and sides of your bag and then stitch them together later. Depending on your intended design, your panels can be circular, square, or rectangular. The front and back panels should be the same size, and so should each of the side panels.

You have many options when it comes to what stitch to use for the panels. You can do a single crochet, double crochet, or half double crochet to create sturdier and denser fabric. But if you want your bag’s design to be more decorative and textured, you can use extended single crochet, front post and back post stitches, cluster stitch, or filter crochet.

After you work the body, you can begin creating your handles. They are also worked separately and then attached to the side of the bag’s body later on. For the handles, you should choose the most durable yarn you can find and work them using single crochet, double crochet, or other intricate stitch patterns you might prefer.

Closures aren’t mandatory when crocheting a bag, but you can definitely add them to secure the bag’s opening. You can use zippers, buttons, drawstrings, magnetic snaps, or decorative clasps, dependent on the style and functionality you’re going for.

The overall structure of your bag will be influenced by the type of yarn you use, your hook size, and stitch tension. You can also undertake reinforcing techniques for more stability and durability, such as lining the bag or adding leather inserts.

Explore Our Free Bag Patterns and Designs
To get started with your crochet bag, we recommend finding a pattern that can guide you through the process. Mary Maxim has a range of crochet bag patterns to help you make market totes, handbags, themed bags, and more.

Before you work on a particular pattern, make sure to choose one that aligns with your skill level and personal style. Identify the type of crochet bag you want to make, and then take a look at the difficulty level of each pattern below to find one that suits you.

We recommend starting with an easy pattern if it’s your first time crocheting a bag and then working on more intermediate or advanced patterns later.

Hook Size: J-10 (6 mm)
Yarn Weight: 5 Bulky
Difficulty: Easy

This simple crochet bag pattern creates a basic tote bag with a decorative body belt and a long handle. It uses bulky yarn and a hook size of 6 mm.

Hook Size: H-8 (5 mm)
Yarn Weight: 5 Bulky
Difficulty: Easy

Create your own tote bag to bring on local farmer’s market trips or grocery store errands with this pattern. It creates a simple tote bag with a distinct texture and decorative elements.

Hook Size: H-8 (5 mm)
Yarn Weight: 4 Medium Worsted
Difficulty: Easy

This pattern yields a stylish autumn tote bag that can easily match your season outfits and you can carry around seamlessly. It uses medium worsted-weight yarn and a hook size of 5mm.

Hook Size: I-9 (5.5 mm)
Yarn Weight: 4 Medium Worsted
Difficulty: Intermediate

Flaunt your personal style with this pattern. It uses medium worsted-weight yarn to create a simple crossbody bag with a loud and stylish ripple design. Feel free to mix and match your favorite colors!

Hook Size: F-5 (3.75 mm)
Yarn Weight: 4 Medium Worsted
Difficulty: Intermediate

Want to create a crochet bag to carry your baby's items? This stylish flower bed diaper bag pattern yields a practical crochet bag with durable handles and a built-in changing mat.

Hook Size: 8 (5 mm)
Yarn Weight: 4 Medium Worsted
Difficulty: Easy

With its loose stitches and airy design, this market bag pattern will help you yield an eco-friendly crochet bag you can use to carry produce. It has a spacious body made of medium worsted-weight yarn to make trips to the market more convenient and stylish.

Hook Size: H-8 (5 mm)
Yarn Type: Cotton Blend (Y015)
Difficulty: Intermediate

Let this Boho-style bag bring a pop of color to your outfit. This pattern allows you to integrate a range of yarn colors to achieve an ombre look that stands out. It also contains instructions for adding a decorative flap closure.

Hook Size: G-6 (4 mm)
Yarn Weight: 4 Medium Worsted
Difficulty: Intermediate

Create a functional yet fashionable beach bag to carry all your towels and change of clothes. This pattern incorporates the colors of the sea, from light and dark blues to refreshing greens. Pair your bag with a crochet beach mat, also taught in this pattern.

Step-by-Step Bag Crochet Tutorial
Ready to make your own crochet bag? Here’s a step-by-step tutorial for an easy crochet tote bag that can get you started.

Bag Measurements: 13 x 15 ins [33 x 38 cm], excluding strap.
Yarn: Bernat Softee Chunky Twists (80 g/2.8 oz) 4 balls of #86010 (Taupe Twists)
Hook Size: 6 mm (U.S. J/10) crochet hook
Gauge: 12 sts and 8 rows = 4 ins [10 cm] in pat.
Abbreviations:
     ● ch = chain
     ● hdc = half double crochet
     ● dcfp = double crochet front post
     ● st= stitch
     ● rep = repeat
     ● yoh = yarn over hook
     ● ws = wrong side

Front and Back Panels
1st row: (RS). 1 hdc in 3rd ch from hook. 1 hdc in each ch to end of ch. Turn. 39 hdc.
2nd row: Ch 2. 1 hdc in first hdc. Yoh and draw up a loop around post of next st at front of work inserting hook from right to left. (Yoh and draw through 2 loops on hook) twice - Dcfp made. *Yoh and draw up a loop around post of next st at back of work inserting hook from right to left. (Yoh and draw through 2 loops on hook) twice. Dcfp in next st. Rep from * to last hdc. 1 hdc in last hdc. Turn. Rep last row for 14½ ins [37 cm], ending with a WS row.
Next row: Ch 2. 1 hdc in each st across. Fasten off.

Strap and Belt
1st row: 1 hdc in 3rd ch from hook. 1 hdc in each ch to end of ch. Turn. 5 hdc.
2nd row: Ch 2. 1 hdc in each hdc across. Turn. Rep last row for 30 ins [76 cm]. Fasten off.

Finishing
Sew side and bottom seams. Sew ends of Strap at side seams inside top edge of Bag. Fold bottom corner flat and sew through all thicknesses on WS 1½ ins [4 cm] from corner.

Belt Loops
1st row: 1 hdc in 3rd ch from hook. 1 hdc in each ch to end of ch. Turn. 3 hdc.
2nd row: Ch 2. 1 hdc in each hdc across. Turn. Rep last row for 2½ ins [6 cm]. Fasten off. Sew Belt Loops in position. Thread Belt through loops and tie at center front.

Crocheting a bag can sound overwhelming at first. But with a little bit of practice, you can ensure an easy and enjoyable experience. Here are some more things to keep in mind during your project for the best outcome:
Use stitch markers: These will help you keep track of your stitches, making it easier to count your stitches and rows.
Keep your yan organized: Consider using yarn holders, bows, or bags to keep your yarn contained and prevent tangles as you work.
Maintain consistent tension: This will ensure your stitches look even.
Try different stitch techniques: The stitch technique that you use will play out in the overall design of your project. Try out different approaches to add variety to your crochet bag.
Enjoy the process: Crocheting is supposed to be a relaxing activity. Don’t get too caught up perfecting your work. Let loose and enjoy the journey!

Customizing and Personalizing Your Bag
While crochet bag patterns exist to guide you through the process step-by-step, don’t be afraid to add your own creative touch to your work. After all, this is YOUR project — deviate from the patterns every once in a while and personalize your crochet bag to suit your tastes and style.

Use your favorite colors, work with different stitches to create unique textures, add embellishments like buttons, tassels, fabric linings, etc., or incorporate unique shapes on the bag’s body panels. Whatever you decide to do, make sure your bag reflects your unique crocheting style.

Finishing Touches and Care Instructions
After you’ve sewn all your bag’s pieces together, you’re not quite done yet. There are a couple more things you need to do to ensure your crochet bag is functional and lasts for years to come.

1. Weave in loose ends: So your crochet bag looks clean and professional, weave in loose ends and hide them from plain sight. This will also minimize yarn that sticks out and can easily be pulled to ruin your crochet project.
2. Blocking: Blocking is the process of washing your project and setting it to shape. It’s a necessary final step to open up the yarn fibers and define your stitches. Depending on the type of yarn you used, you can either do wet blocking, steam blocking, or spray blocking.
3. Washing: Refer to your yarn label to determine the best way to wash your crochet bag. Hand washing is generally the best option, but there are yarns that can be safely tossed in the washer or dryer. Keep in mind that you don’t need to wash your crochet bag often — the less you do, the longer you retain its quality.
4. Drying: When drying your crochet bag, lay it flat on a surface and pull the ends to stretch the fabric. Don’t hang your bag, as the weight can cause it to lose its shape.
5. Storing: Before storing your crochet bag, make sure it’s clean and completely dry. To prevent bugs and mold, you can place the bag inside a Ziplock bag or airtight container.

Conclusion
Crocheting your own bag gives you a relaxing pastime and allows you to personalize your work according to your unique taste and style. Before starting, be diligent in doing the prep work, from choosing the right yarn and hook size to understanding your bag’s construction and learning your stitches.
While the process might seem overwhelming at first, it only takes practice for you to get the hang of it. Keep your tension even, pay attention to your stitch count, and get creative with finishings and embellishments. But most of all, enjoy the process!
Now, you’re just about ready to start making your own crochet bag. Choose a pattern we provided above — one that suits your style and skill level, and get crocheting!