How to Crochet a Blanket with Thick Yarn:
Step-by-Step Tutorial
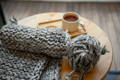
Source: Freepik
Crocheting a blanket with thick yarn is a simple yet satisfying project, ideal for those looking to add a cozy, handmade touch to their home. Whether you're new to crochet or experienced, thick yarn is a great choice because it works up quickly and offers a lovely, chunky texture. If you’ve been eyeing a thick yarn blanket, you’re in the right place. This tutorial will guide you step-by-step through the process so you can make a blanket you’ll be proud to use or gift.
Let’s dive in!
Why Thick Yarn is Perfect for Blankets
Using thick yarn for blankets has several advantages. First, it helps speed up the project. Compared to thinner yarns, thick yarn creates a soft, textured fabric and works up much faster. The results are just as cozy but come together in no time. Mary Maxim offers a wide selection of bulky yarns, perfect for projects like this.
Thick yarn is also ideal for colder weather, providing extra warmth and comfort. And, if you’re looking for a tactile, satisfying crafting experience, bulky yarn is a delight to crochet with.
Materials You’ll Need
To get started, gather the following materials:
● Thick yarn (Mary Maxim’s selection of bulky yarns is great for blankets)
● A crochet hook (size N or P, depending on your yarn)
● Scissors
● A tapestry needle
● Measuring tape
Once you have everything ready, you’re good to go!
Step 1: Make Your Foundation Chain
To start your blanket, make a foundation chain. The number of chains you need depends on how wide you want your blanket to be. For example, if you want a blanket that’s about 40 inches wide, you’ll need to chain enough stitches to match that width.
Start by making a slip knot and then chain the required number of stitches. Keep in mind, with thick yarn, the chain will look wider than it would with thinner yarn, even with fewer stitches.
Step 2: Start the First Row
After completing your foundation chain, you’ll begin crocheting your first row. For thick yarn, a double crochet stitch works beautifully. It creates a soft, textured fabric that’s easy to make, especially when using bulky yarn.
To double crochet:
1. Yarn over (wrap the yarn over your hook).
2. Insert your hook into the next stitch.
3. Yarn over and pull through, so you now have three loops on your hook.
4. Yarn over again and pull through the first two loops.
5. Yarn over once more and pull through the last two loops.
Repeat this across the row until you reach the end. Once you finish, turn your work around to start the next row.
Step 3: Turn and Continue
Once your first row is complete, turn your work and crochet back in the opposite direction. This pattern will continue until your blanket is the size you want. To maintain an even texture, make sure your tension is consistent, but don’t worry if you get distracted, it’s normal to take breaks while working on a blanket.
If you’re a beginner, don’t stress about the stitch count too much. Just keep your stitches even, and remember, this is supposed to be fun.
Step 4: Add Texture (Optional)
To give your blanket a bit more personality, you can experiment with different crochet stitches. Some popular options include:
● Basketweave: This stitch creates a textured woven look that’s perfect for blankets.
● V-Stitch: A simple and elegant option, giving a bit of extra charm to your project.
● Bobble Stitch: For those who want some extra puff and fun in their blanket, the bobble stitch adds dimension and visual interest.
While these stitches are optional, they can really make your blanket unique and personalized.
Step 5: Keep Crocheting Until You Reach the Desired Size
Now, continue crocheting until your blanket is the size you want. You can check the dimensions with a measuring tape as you go along. A standard throw blanket is typically around 50 inches by 60 inches, but you can adjust the size to fit your needs. If you’re making a bed blanket, you might want to go for a larger size, like 60 inches by 80 inches.
Enjoy the process, and take your time. Remember, the joy is in the making!
Step 6: Finishing Off Your Blanket
Once your blanket is the perfect size, it’s time to finish. Cut the yarn, leaving a few extra inches. Pull the yarn through the last loop to secure it and then use a tapestry needle to weave in any loose ends. Make sure everything is neat and tucked away.
Congratulations, your blanket is now complete and ready for use!
Final Thoughts
Crocheting a blanket with thick yarn is an enjoyable and rewarding experience. With the right materials and a little time, you can create something beautiful and warm to enjoy. Whether you’re gifting it to a friend or keeping it for yourself, a chunky yarn blanket is sure to become a cozy favorite.
If you're looking for the perfect yarn for your next project, Mary Maxim’s selection of bulky yarns offers plenty of options to help bring your crochet creations to life.
Happy crocheting, and enjoy the process!
